Website

Connect Thikaa with Any Website

Design your smart chat widget and add it to your website from the Widget Designer

Universal Integration

Thikaa widget works with any website regardless of the technology used. Plain HTML, WordPress, Shopify, Squarespace, Wix, or any other platform.

Supported Platforms

HTML/CSS/JS
WordPress
Shopify
Wix
Squarespace
Webflow
React/Vue/Angular
And any other platform

Widget Designer Overview

The Widget Designer is an all-in-one tool that lets you customize your chat widget, preview it live, and get the installation code, all from a single page.

Widget Designer - Full Page

Widget Customization

Select bot, display name, theme color, button style, widget position, behavior, and language

Live Preview

See exactly how the widget will look on your website in real time

Installation Code

API Key, allowed domains, rate limits, and embed code

Steps to Add the Widget to Your Website

1

Open the Bot Hub

From the admin dashboard, click "Bot Hub" in the top bar

Thikaa Bot Hub page
2

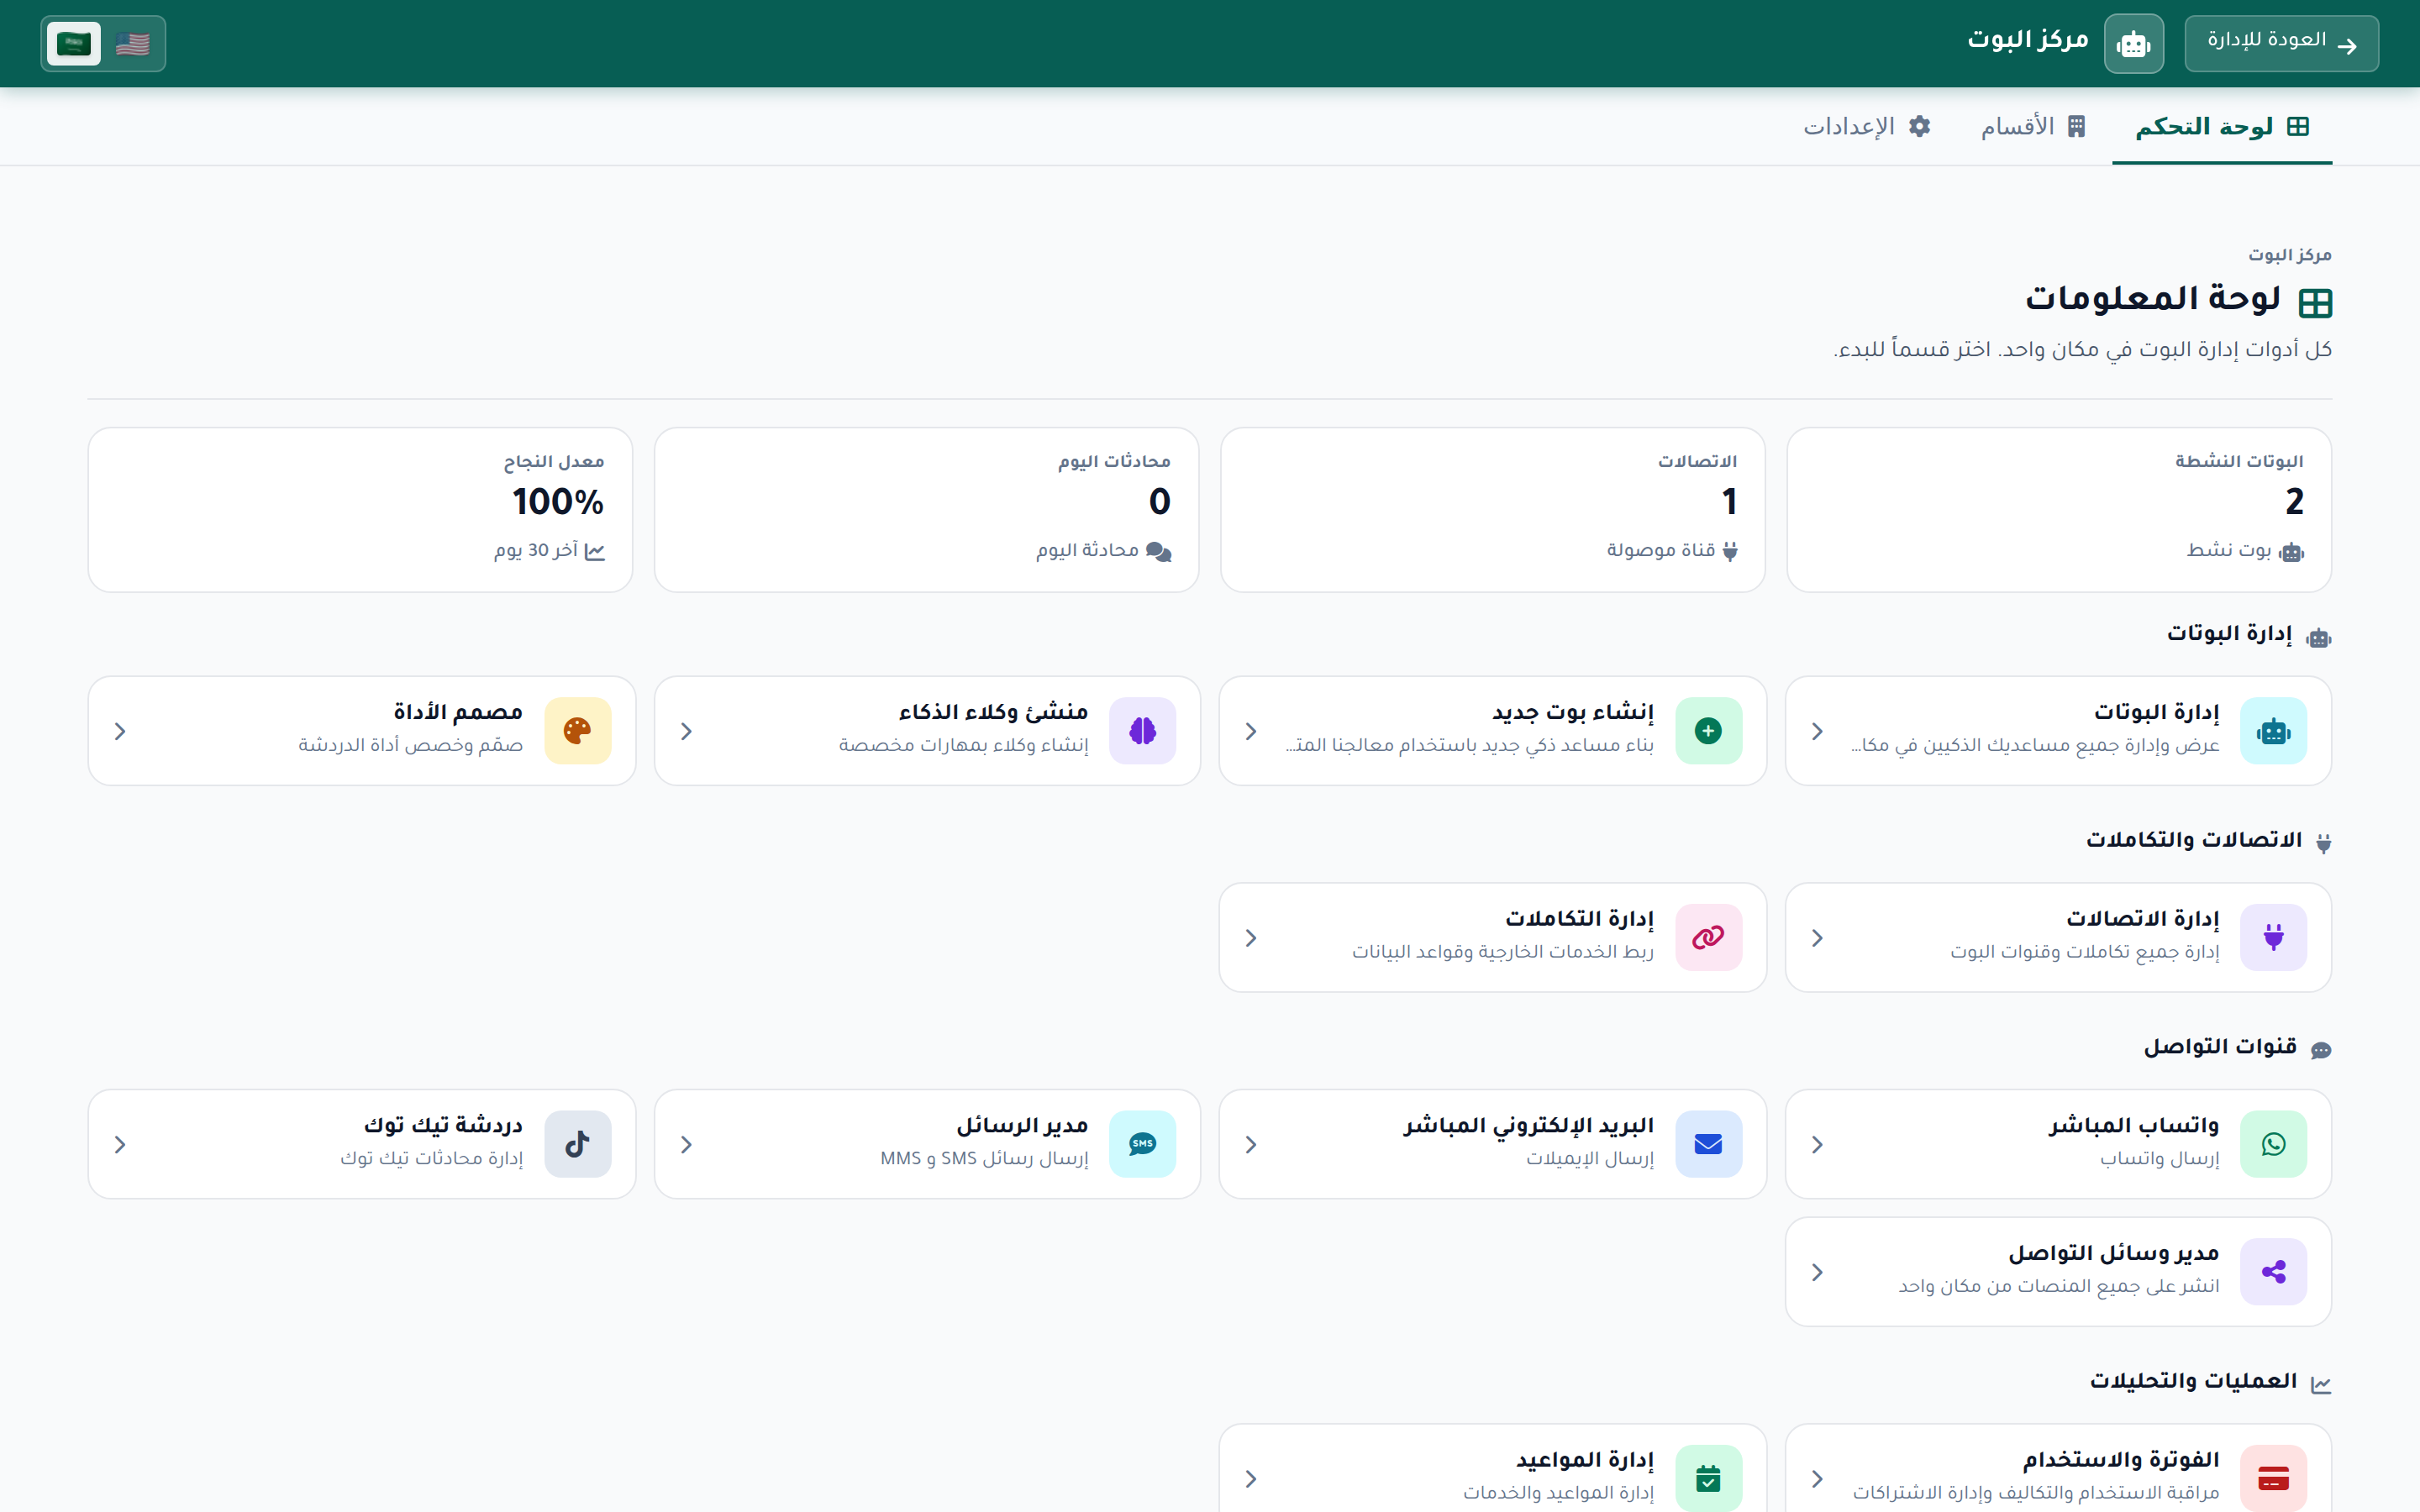
Open Widget Designer

In the Bot Hub, click the "Widget Designer" card to open the Widget Designer page

Look for the "Widget Designer" card at the bottom of the Bot Hub page. It takes you to the "Widget Designer" page which has everything you need.
3

Select Bot & Customize Appearance

In the right panel "Widget Customization", select the bot that will power your website widget, then customize the theme color, button style (square/rounded/circle), and widget position. See changes live in the preview.

Widget Designer page - Widget Customization
4

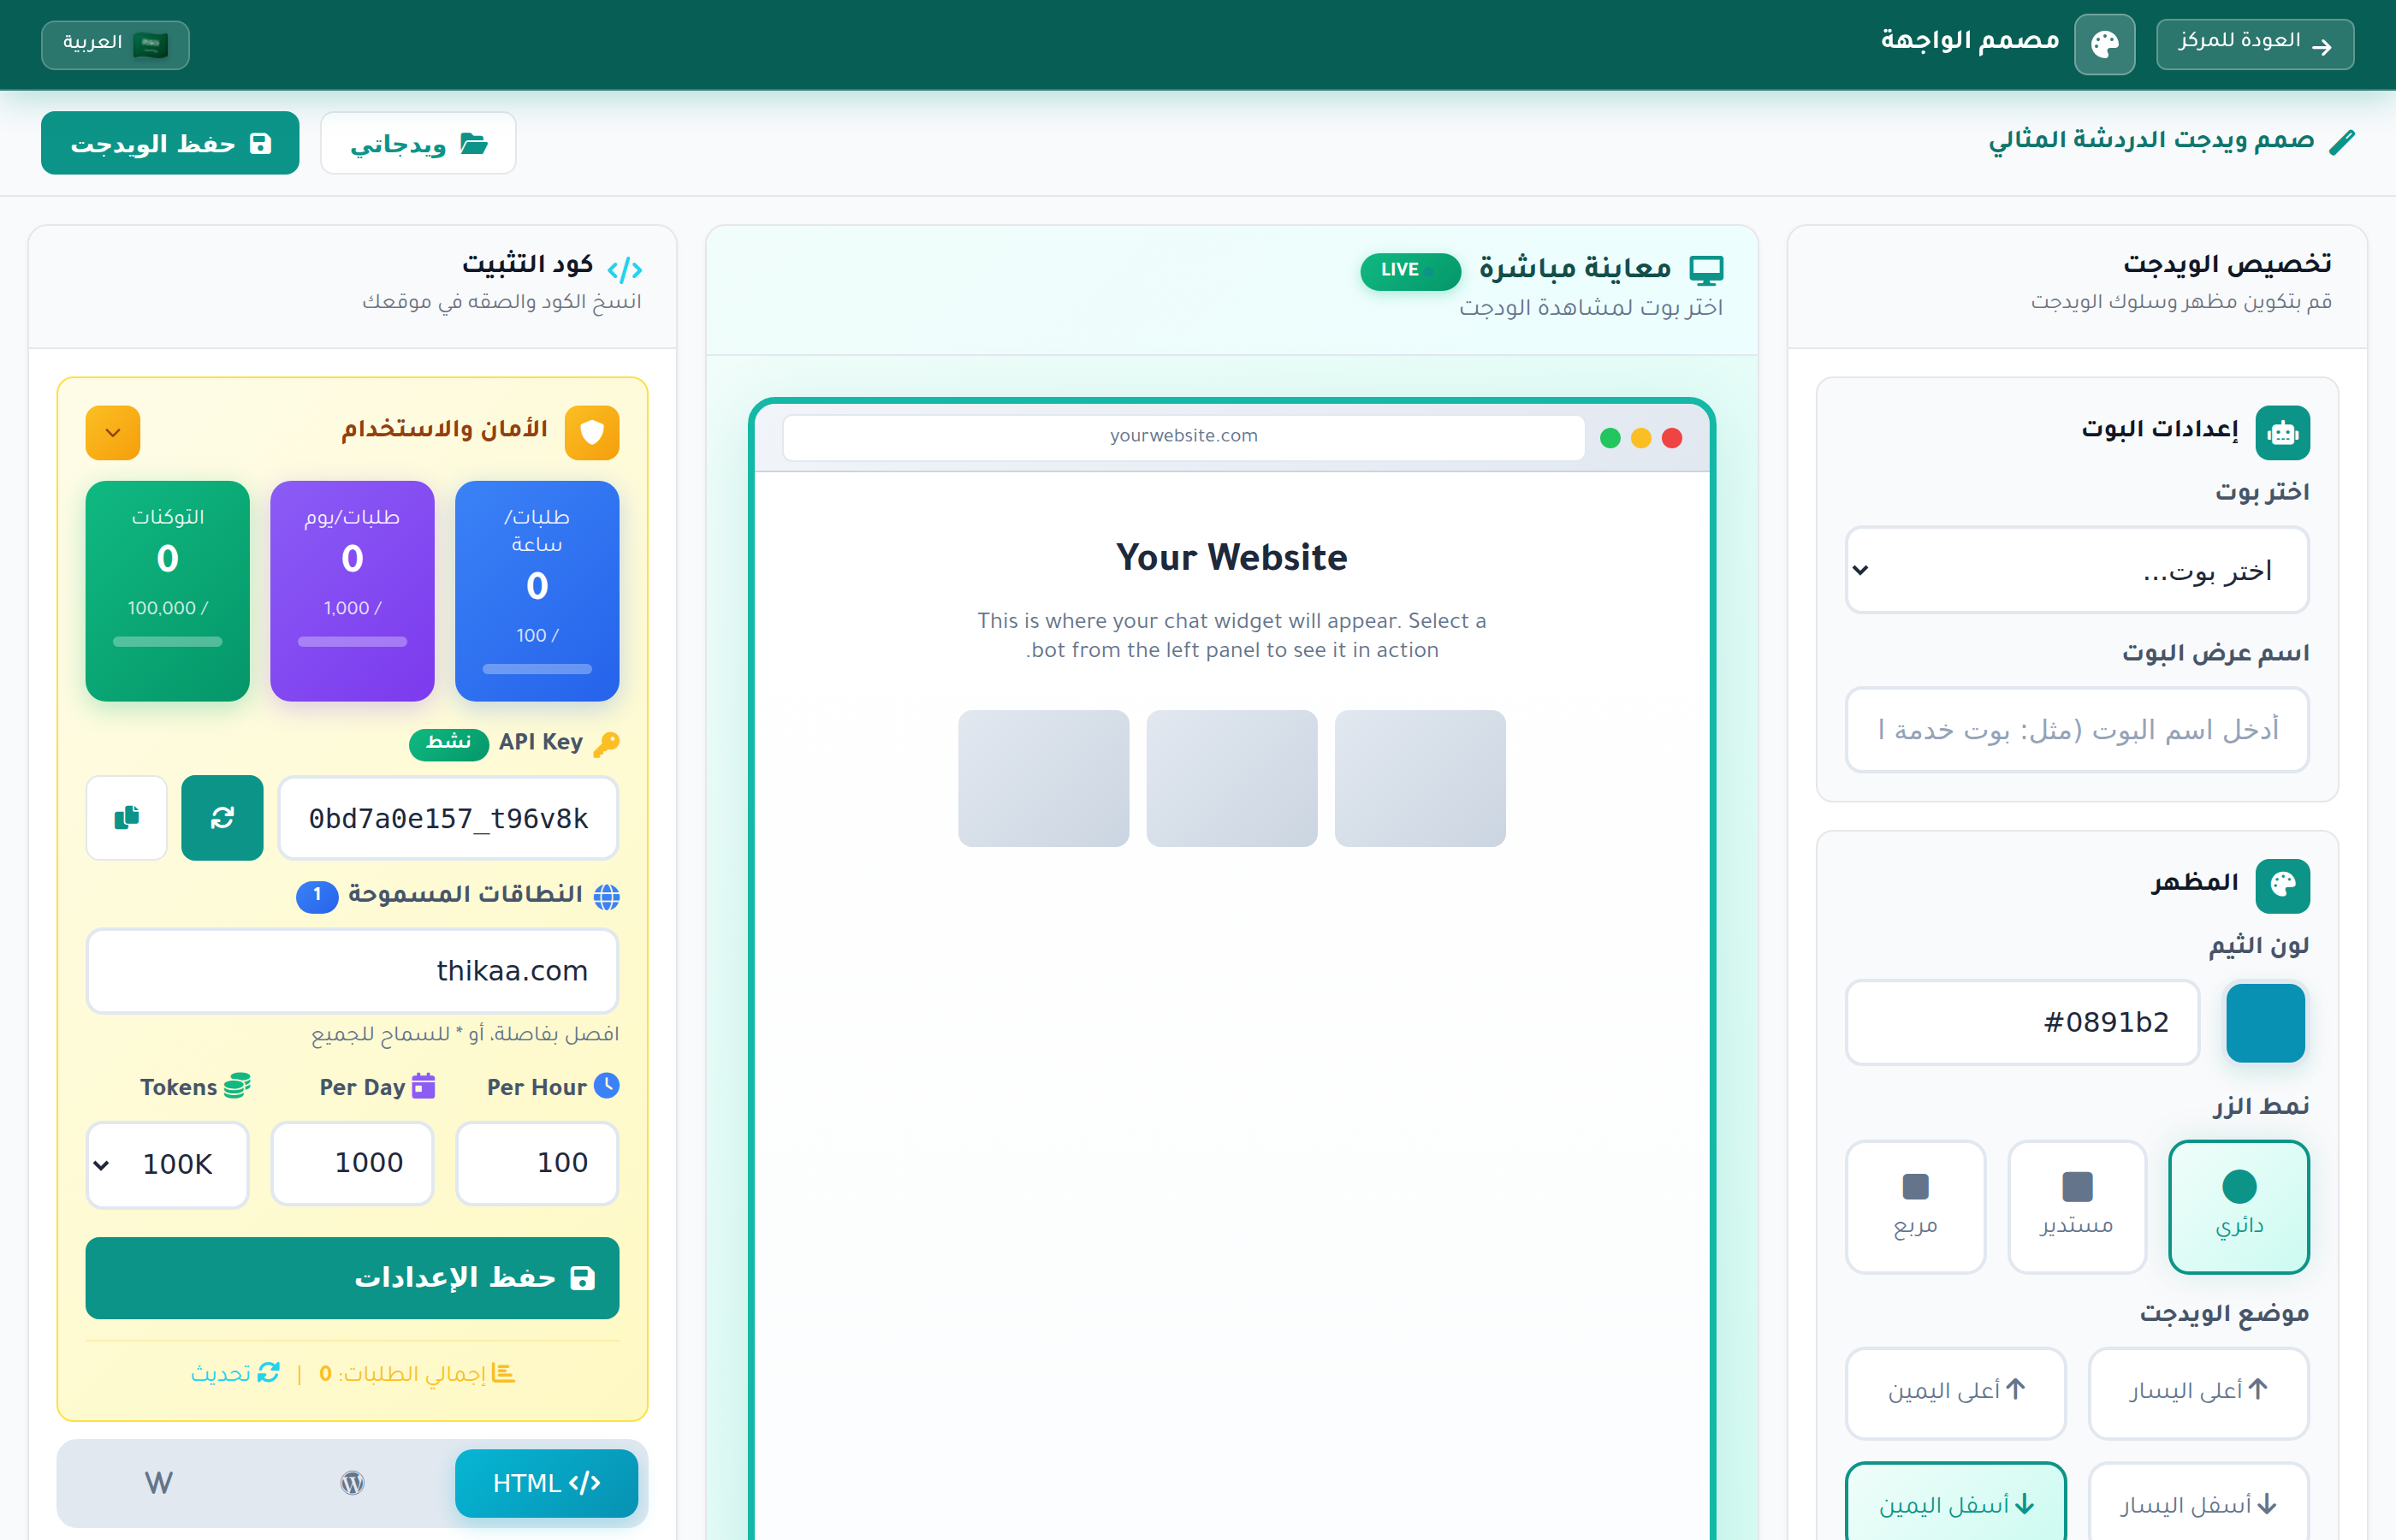
Set Up Installation Code

In the left panel "Installation Code": copy your API Key, add your website domain under "Allowed Domains", and set rate limits. Then click "Save Settings".

The API Key appears with a green "Active" badge. Make sure to add your website domain (e.g., example.com) in the Allowed Domains field, then click "Save Settings".
5

Copy Code & Add to Your Website

At the bottom of the Installation Code panel, choose the embed method: "HTML " for direct code or "WordPress" for the WP plugin. Copy the code and paste it in your website before .

W WordPress HTML </>
<!-- Thikaa Chat Widget -->
<script>
(function() {
    var s = document.createElement('script');
    s.src = 'https://thikaa.com/thik_tenant_YOURSTORE/embed/widget-loader.js?key=YOUR_API_KEY';
    s.async = true;
    document.body.appendChild(s);
})();
</script>
You don't need to write the code manually! The ready-made code appears at the bottom of the "Installation Code" panel in Widget Designer. Just copy and paste it.

Customization Options in Widget Designer

Bot Settings
Select Bot Choose any of your bots to power the widget
Bot Display Name The name visitors see in the chat window
Appearance
Theme Color Primary widget color (e.g., #0891b2)
Button Style Square, Rounded, or Circle
Widget Position Top-right, Top-left, Bottom-right, or Bottom-left
Behavior
Welcome Message The message shown when chat opens
Auto-open on page load Toggle on/off
Show notification badge Toggle on/off
Language Choose widget language (Arabic, English, etc.)
Sound Settings
Sound Settings Enable notification sounds, choose sound type and volume level

Security & Usage

API Key Unique widget key (e.g., 0bd7a0e157_t96v8k). You can copy or refresh it.
Allowed Domains Add your website domain (e.g., example.com). Use * to allow all domains. Separate with comma for multiple domains.
Rate Limits Tokens (100K default), Per Day (1000), Per Hour (100)

Platform Guides

Plain HTML

Copy the code from the "HTML " tab in Widget Designer and paste before in your HTML file

WordPress

Use the "WordPress" tab in Widget Designer to download the plugin, or paste the HTML code in footer.php or via Insert Headers and Footers plugin

Shopify

Copy the HTML code from Widget Designer, then go to Online Store > Themes > Edit Code > theme.liquid and paste before

Wix

Copy the HTML code from Widget Designer, then go to Settings > Advanced > Custom Code and paste the code

Squarespace

Copy the HTML code from Widget Designer, then go to Settings > Advanced > Code Injection and paste in Footer

Webflow

Copy the HTML code from Widget Designer, then go to Project Settings > Custom Code > Footer Code

Widget Features

AI-powered smart responses
Multi-language support
Mobile responsive design
Fast loading (Async)
Full customization from Widget Designer
Full RTL support
Human support handoff
Live preview before publishing

Troubleshooting

Widget not showing

Make sure the code is directly before , that your API Key is correct and active, and that your website domain is added in "Allowed Domains" in Widget Designer

Widget shows but doesn't work

Make sure an active bot is selected in Widget Designer, and check the browser Console for errors

Widget conflicts with site elements

Change the widget position from Widget Designer (top-right/left or bottom-right/left)

Rate limits exceeded

Review the rate limit settings in the "Installation Code" panel in Widget Designer and increase as needed

Frequently Asked Questions

Does the widget affect site speed?

No, the widget loads asynchronously and does not affect site loading speed

Does it work on mobile?

Yes, the design is fully responsive and works on all devices and screens

Can I customize the widget appearance?

Yes, from Widget Designer you can change the color, button style, position, welcome message, sound, and language with live preview

Is data secure?

Yes, all connections are encrypted via HTTPS. Allowed Domains prevent the widget from being used on unauthorized sites.

Where do I find my API Key?

In Widget Designer, the left panel "Installation Code" - the API Key is shown with an "Active" badge and you can copy or refresh it

Need Help?

Our team is ready to help you set up the widget on your website